Master the chained beasts rhino boss fight with expert combat strategies, crowd management tips, and weapon tactics for Featherweight Games' hit title.
Published: Chained Beasts Wiki Editorial Team
Video Guide
Chained Beasts Demo: Solo Gladiator vs the Rhino BossTable of Contents
Entering the Arena: Facing the Ultimate Test
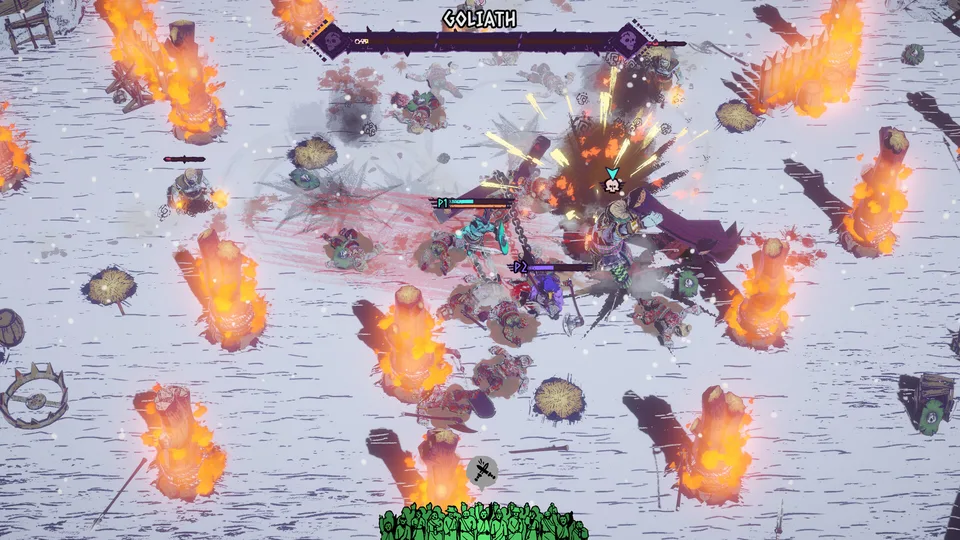
Stepping into the blood-soaked arenas of Featherweight Games' hit title is already a harrowing experience, but encountering the chained beasts rhino boss takes the challenge to an entirely new level. When you are tracking your survival in this chaotic gladiator roguelike, mastering the chained beasts rhino boss is essential for progressing past the early acts. This encounter tests your reflexes, weapon accuracy, and spatial awareness while forcing you to juggle hostile spectators and devastating boss charges.
In the fast-paced world of brutal arena combat, understanding how to read your enemy can mean the difference between glorious victory and becoming permanent floor decoration. Whether you are playing solo with a heavy rock tied to your chain or coordinating with up to four friends in chaotic co-op, surviving this encounter demands respect and preparation. Let us break down the mechanics, strategies, and optimal loadouts needed to conquer this armored beast.
Understanding the Rhino Boss Mechanics and Environment
The battle against Beastmaster Barka and his massive mount is designed to punish reckless button-mashing. The arena itself acts as a double-edged sword, littered with pillars and hazards that can either help you control spacing or violently interrupt your movement. According to player experience reports, recognizing the visual cues of the charge is your primary defense against sudden defeat.
Observe the Charge Wind-Up: Watch the rhino's posture and keep yourself off its linear charging path to avoid taking catastrophic damage.
Leverage the Chain Dynamics: Use your chain weapon to maintain offensive pressure on enemies while constantly repositioning away from obstacles.
Manage Crowd Expectations: Balance spectator demands for throw kills with your primary survival instincts so you do not chase risky angles.
Isolate the Threats: Focus your attacks to separate Barka from his mount or companion threats whenever a clear opening appears.
When managing the chaos of the pit, keeping track of your positioning relative to environmental pillars prevents awkward snags that leave you vulnerable. The following comparison highlights how different combat approaches perform against the heavy armor of the boss.
Strategy Approach
Primary Advantage
Main Risk
Recommended For
Solo Chain Control
Higher reliability on single target focus
Punishing movement errors
Solo combatants
Co-Op Coordination
Splits boss aggro and crowd focus
Friendly fire and clutter
2-4 player groups
Throw-Heavy Focus
Satisfies crowd and triggers bonuses
Dangerous positioning requirements
Advanced risk-takers
Essential Skills, Items, and Afflictions
Surviving the grueling battles leading up to the main encounter requires careful management of your build. As you progress through the acts, merchant interactions become vital checkpoints for your survival. Purchasing defensive upgrades, such as shield spikes that deal damage to attackers when you block, transforms defensive play into a reliable counter-offensive tool.
However, the game introduces debilitating physical and mental afflictions whenever you heal between rounds. These mechanics add layers of tactical depth to your run.
Impulsive Affliction
Forces you to lock in a new skill every second level and purchase an item at every shop, removing hesitation and demanding quick adaptation to unexpected loadouts.
Annoying Affliction
Causes cooperative allies to frequently attack if you get too close, turning tight formations into high-risk spatial puzzles during boss fights.
Infatuated Affliction
Locks your camera onto a particular ally while granting a valuable +10% damage boost when they are looking directly at you.
For players looking to optimize their combat efficiency, evaluating your build path against enemy scaling is crucial. You can check out more community guides and official updates directly on the Chained Beasts Steam Store Page.
Advanced Combat Tactics for Victory
To consistently defeat the chained beasts rhino boss, you must master the art of disciplined aggression. The encounter changes dramatically once Barka is separated from his mount or when additional enemies flood the arena, turning a readable duel into a chaotic committee meeting with weapons.
Tip
Always clear minor nuisances before committing heavy cooldowns to the boss, as a crowded arena drastically reduces your dodge pathways.
Furthermore, keeping your health pool intact during the initial phases ensures you can absorb the occasional mistimed dodge. Community reports emphasize that treating the chain as both a secondary weapon and a navigation tool allows gladiators to control enemy spacing effectively.
Warning
Standing still in this roguelike is a very detailed way to become floor decoration. Never remain stationary for more than a brief strike window.
Frequently Asked Questions
Can I face the chained beasts rhino boss in solo mode?
Yes, the game fully supports solo runs, where your chain is paired with a heavy rock to help balance crowd control and engagement distance.
What rewards do I earn from fighting the rhino boss?
Engaging in this high-tier encounter yields substantial experience points and progression currency, even if your run ends in defeat.
How do afflictions impact my battle against the rhino?
Afflictions introduce unique handicaps and tactical constraints that alter your combat style, requiring careful adaptation during merchant visits between rounds.